Barbed Wire
| Barbed Wire | |
|---|---|
 | |
| General | |
| Category | Cover and obstruction |
| Hammer | Small, Medium, Large |
| Building | |
| Build cost | 7 Build Supplies |
| Build time | 4 hits Small (2.3 s), 2 hits Medium (1.1 s), 2 hits Large (1.8 s). Derived from the hammer swing timing, not timed in play. |
| Health | 250 HP |
| Damage | |
| Bullets | -85% |
| Melee | -28% |
| Grenades | +0% |
| Rockets | +200% |
| C4 | +150% |
| IEDs | +400% |
| Internal name | DA_Buildable_BarbedWire |
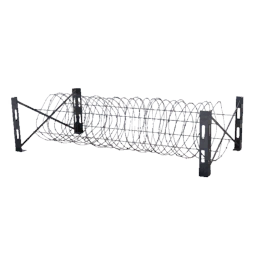
Barbed Wire is a cheap wire obstacle that any hammer can build. It costs 7 Build Supplies and has 250 HP, the lowest health of any structure. It takes more melee damage than most walls, and only 15% of bullet damage gets through. Anyone standing in it is slowed and hurt.
Overview
Barbed Wire costs 7 Build Supplies and has 250 HP. It has no separate parts.
Destroying an enemy Barbed Wire pays 5 cash and 5 Role XP.
Building it
- Cost: 7 Build Supplies, whichever hammer builds it. Nothing is charged at placement.
- Hammers: Small, Medium or Large.
- Placement: Barbed Wire is one of the four small structures. It does not need a friendly base radius, but it cannot be placed inside an enemy base radius. It cannot be placed within 3 m of a safe zone or while standing in one, and not within 1 m of a ladder.
- Stack limit: 100.
- Build stages: Five, at 0, 25, 50, 75 and 100% of progress.
- Weak spots: switched off. Its build stages do not show the hammer bonus, so each hit adds the normal amount, multiplied by its build factor of 3.5 (see Buildables).
- Build time: Estimated from the hits to build in the table below, one hit per swing (derived, not timed in play).
| Building it | Small hammer | Medium hammer | Large hammer |
|---|---|---|---|
| Hits to build | 4 (about 2.3 s) | 2 (about 1.1 s) | 2 (about 1.8 s) |
| Hits to repair from zero health | 9 | 5 | 3 |
| Hits to dismantle (your own) | 2 | 2 | 1 |
Seconds are an estimate: one hammer hit per swing, 0.567 s per hit for the Small and Medium hammers and 0.883 s for the Large (derived from the use animation, not measured).
What it does
Barbed Wire is more than an obstacle. A built wire has a narrow trigger box around it (roughly 0.8 m thick, 2.7 m long and 1.4 m high, worked out from the box size). Anything that enters the box is tracked until it leaves, and a check runs every 0.4 s while at least one thing is inside.
- On foot. A living player standing in the box takes 8 damage on every check, which is 20 damage per second, and the screen shakes briefly. Players inside a vehicle are skipped. The effect that cuts movement to 7.5% of normal speed is listed on the wire for people in the box (the game applies it, inferred), so a player caught in the wire crawls.
- In a vehicle. A moving vehicle in the box has its wheels cut. Each wheel loses 10% of its full health on every check, and a wheel stops taking this damage once it is down to 15% health. A vehicle that is standing still is not hurt. Tracked vehicles and helicopters are treated as resistant and are not cut (the check reads the tracked and rotary vehicle tags).
- Who gets credit. The damage on players is credited to the player who built the wire. Whether it spares the builder’s own team was not checked.
Durability
A change of -28% means 72% of the melee damage gets through. The other numbers follow the same reading as in the Sandbag Wall article.
| Source | Change | Share of damage that gets through |
|---|---|---|
| Bullets | -85% | 15% |
| Melee | -28% | 72% |
| Grenades | +0% | 100% |
| Rockets | +200% | 3 times |
| C4 | +150% | 2.5 times |
| IEDs | +400% | 5 times |
Barbed Wire’s 250 HP is the lowest of any structure. The table below gives the hits it takes to destroy, for each source.
Hits to destroy (point blank, derived)
Derived from each source’s base damage and the damage table. It is not a count from play: each figure assumes every shot lands at point blank for full damage, with no falloff and no other rules, so real fights can differ. Base damage used: M4 5.56 mm FMJ 28, .50 cal FMJ 90, 120 mm rocket 150, M67 frag grenade 100 (it counts as a rocket against structures), C4 charge 250, IED 300. Each figure is the number of hits needed after every matching damage entry is applied.
| Structure | HP | M4 5.56 mm FMJ | .50 cal FMJ | 120 mm rocket | M67 frag grenade | C4 charge | IED |
|---|---|---|---|---|---|---|---|
| Barbed Wire | 250 | 60 | 19 | 1 | 1 | 1 | 1 |
Season 2 changes
- No Season 2 change to Barbed Wire’s cost or health is listed.
- The Season 2 damage table gained a 125 mm shell entry for Barbed Wire, but its amount is 0, so nothing changed.
See also
- Building: costs, hammers and placement for every structure
- Recon Tent and Hedgehog: the other small structures
Sources
- Buildables: cost, health, stages, damage table, placement conditions and cash rewards
- Damage Pipeline: how the percentage changes are applied (section 6)
- Items and equipment changes, Season 2: the buildable changes
- Round 36 combat evidence: derived hits to destroy for each source of damage.
- Round 38 building evidence, native: the build, repair and dismantle arithmetic
- Round 38 building evidence, data: weak spots, placement checks and the buildable settings
- Round 57 open questions: what triggers the wire’s slow and damage
- Round 42 buildables and economy evidence: structure hit counts for every listed source (stacked damage entries, IED and the M67 as a rocket) and the build time estimates.
Categories: BuildingStructures